浅析 Android 消息机制
Android 消息机制贯穿了 Android 应用程序运行,各个线程的消息队列就相当于一条条的大运河,每条运河旁边都有着一条条小路(无Looper的线程),消息相当于从小路上放下的船,在各个运河汇聚、处理,这个比喻可能有些不当,但也足以说明消息机制的重要性。很多优秀的博客都对消息机制做出了很详细的讲解,比如罗升阳老师的博客,本文将从初级使用开始讲解,通过解答正常学习中会遇到的疑问逐渐深入到framework中去。
1. 简单使用
说到在开发中使用消息机制,离不开一个类:Handler,看过一些例子或者入门资料后我们都可以轻易写出下面的代码:
public class TestActivity extends Activity{

    Handler mHandler = new Handler(){

        @Override
        public void handleMessage(Message msg) {
            switch (msg.what) {
            //TODO
            default:
                break;
            }
            super.handleMessage(msg);
        }

    };
    ......
}
这种写法绝大多数情况是没什么问题的,也是几乎正确的写法,为什么这么说呢?lint跑一遍其实就可以报出这样的警告:This Handler class should be static or leaks might occur,即用匿名类的写法,由于匿名类拥有外部类的实例,有时候可能会内存泄漏(看下stackoverflow的这个问题,讲的已经够清除了,在此不再累述),那么加以修正我们写出了这样的较为广泛的用法:
public class TestActivity extends Activity{
    Handler mHandler = new MyHandler(this);

    static class MyHandler extends Handler{
        private WeakReference<Activity> weakRef;
        @Override
        public void handleMessage(Message msg) {
            Activity ref = weakRef.get();
            if (null == ref || ref.isFinishing()) {
                return;
            }
            MainActivity activity = (MainActivity) ref;
            switch (msg.what) {
            //TODO
            default:
                break;
            }
            super.handleMessage(msg);
        }

        public MyHandler(Activity activity) {
            super();
            weakRef = new WeakReference<Activity>(activity);
        }
    }
    ......
}
这样就基本可以应付简单需求了,通过 Handler 的 send* 系列的方法,我们可以轻易的让我们的程序在不同的线程中传递消息。
2. 非UI线程的使用
Handler 既然是线程通信的一种手段,那么是不是所有线程都可以像上述代码那样写呢?肯定是不行的。如我们在Activity的 onCreate 中创建一个新线程,在这个线程中我们 new 出这个 Handler,会直接抛出运行时错误 "Can't create handler inside thread that has not called Looper.prepare()",那么正确的使用方法是什么呢?引用下官方的例子:
class LooperThread extends Thread {
    public Handler mHandler;

    public void run() {
        Looper.prepare();

        mHandler = new Handler() {
            switch (msg.what) {
            case MSG_QUIT:
                Looper.myLooper().quit();
                break;
            default:
                break;
            }
        };

        Looper.loop();
    }
}
Looper.prepare 的作用是在当前线程中创建线程对应的 Looper(消息队列),Looper.loop 是开始消息循环。Looper.quit 是退出消息循环,一定要注意,若不用该线程一定要退出消息循环。
那么 sdk 中有没有一种自带 Looper 的线程实现呢?那就是 HandlerThread 了,HandlerThread的源码非常简单,除了已经做好了 Looper 的创建、退出,还提供了获取 Looper、获取TID等接口:
public class HandlerThread extends Thread {
    int mPriority;
    int mTid = -1;
    Looper mLooper;

    public HandlerThread(String name) {
        super(name);
        mPriority = Process.THREAD_PRIORITY_DEFAULT;
    }

    public HandlerThread(String name, int priority) {
        super(name);
        mPriority = priority;
    }

    protected void onLooperPrepared() {
    }

    public void run() {
        mTid = Process.myTid();
        Looper.prepare();
        synchronized (this) {
            mLooper = Looper.myLooper();
            notifyAll();
        }
        Process.setThreadPriority(mPriority);
        onLooperPrepared();
        Looper.loop();
        mTid = -1;
    }

    public Looper getLooper() {
        if (!isAlive()) {
            return null;
        }

        synchronized (this) {
            while (isAlive() && mLooper == null) {
                try {
                    wait();
                } catch (InterruptedException e) {
                }
            }
        }
        return mLooper;
    }

    public boolean quit() {
        Looper looper = getLooper();
        if (looper != null) {
            looper.quit();
            return true;
        }
        return false;
    }

    public int getThreadId() {
        return mTid;
    }
}
HandlerThread 并不自带 Handler,需要使用 Handler 的带参构造函数指定该 HandlerThread 的 Looper 来创建一个 Handler:
HandlerThread mHandlerThread = new HandlerThread(mThreadName);
mHandlerThread.start();
MyHandler handler = new MyHandler(mHandlerThread.getLooper());
这里给出一个公司正在用的一个集成了Handler、HandlerThread、延迟运行、自退出逻辑的线程类实现(抽象类),感觉也不算是什么机密代码,发出来大家可以借鉴借鉴:
public abstract class WorkQueuedExecutor implements Handler.Callback {
    private final int mMaxMsgWhatId;
    private HandlerThread mHandlerThread;
    private Handler mWorkHandler;
    private final long mQuitDelay;
    private final String mThreadName;

    private static final int MSG_WORK_QUIT_LOOPER = -1000;

    protected WorkQueuedExecutor(int maxMsgId, long quitDelay, String threadName) {
        mMaxMsgWhatId = maxMsgId;
        mQuitDelay = quitDelay;
        mThreadName = threadName;
    }

    private synchronized void ensureWorkThreadStarted() {
        if (mHandlerThread == null) {
            mHandlerThread = new HandlerThread(mThreadName);
            mHandlerThread.start();
            mWorkHandler = new WorkHandler(mHandlerThread.getLooper(), this);
        }
    }

    private synchronized void quitLooper() {
        Looper looper = mHandlerThread.getLooper();
        if (looper != null) {
            looper.quit();
        }
        mHandlerThread = null;
        mWorkHandler = null;
    }

    public synchronized final boolean sendMessage(Message msg) {
        ensureWorkThreadStarted();
        return mWorkHandler.sendMessageDelayed(msg, 0);
    }


    public synchronized final boolean sendMessage(int what, int arg1, int arg2, Object obj) {
        ensureWorkThreadStarted();
        return mWorkHandler.sendMessageDelayed(mWorkHandler.obtainMessage(what, arg1, arg2, obj), 0);
    }


    public synchronized final boolean sendMessage(int what, int arg1, int arg2) {
        ensureWorkThreadStarted();
        return mWorkHandler.sendMessageDelayed(mWorkHandler.obtainMessage(what, arg1, arg2), 0);
    }

    public synchronized final boolean sendEmptyMessage(int what) {
        ensureWorkThreadStarted();
        return mWorkHandler.sendEmptyMessageDelayed(what, 0);
    }

    public synchronized final boolean sendMessageDelayed(Message msg, long delayMillis) {
        ensureWorkThreadStarted();
        return mWorkHandler.sendMessageDelayed(msg, delayMillis);
    }

    public synchronized final boolean sendMessageDelayed(int what, long delayMillis) {
        ensureWorkThreadStarted();
        return mWorkHandler.sendMessageDelayed(mWorkHandler.obtainMessage(what), delayMillis);
    }

    public synchronized final boolean sendMessageAtFrontOfQueue(int what) {
        ensureWorkThreadStarted();
        return mWorkHandler.sendMessageAtFrontOfQueue(mWorkHandler.obtainMessage(what));
    }

    public synchronized final boolean sendMessageAtFrontOfQueue(int what, Object obj) {
        ensureWorkThreadStarted();
        return mWorkHandler.sendMessageAtFrontOfQueue(mWorkHandler.obtainMessage(what, obj));
    }

    public synchronized final void removeMessages(int what) {
        ensureWorkThreadStarted();
        mWorkHandler.removeMessages(what);
    }

    public synchronized final boolean hasMessages(int what) {
        ensureWorkThreadStarted();
        return mWorkHandler.hasMessages(what);
    }


    protected void onQuitLoop() {
        //System.gc();
    }

    @Override
    public abstract boolean handleMessage(Message msg);


    private class WorkHandler extends Handler {
        private WorkHandler(Looper looper, Callback callback) {
            super(looper, callback);
        }

        @Override
        public void dispatchMessage(Message msg) {
            super.dispatchMessage(msg);

            if (msg.what == MSG_WORK_QUIT_LOOPER) {
                synchronized (WorkQueuedExecutor.this) {
                    if (quitLoopIfNeed()) {
                        onQuitLoop();

                        quitLooper();
                        //able go here?
                        return;
                    }
                }
            }
            sendEmptyMessageDelayed(MSG_WORK_QUIT_LOOPER, mQuitDelay);
        }

        private boolean quitLoopIfNeed() {
            for (int i = 0; i <= mMaxMsgWhatId; i++) {
                if (hasMessages(i)) {
                    return false;
                }
            }
            return true;
        }

    }

}
3. 一级分析 - Looper与消息队列
前面说道在新建的线程中使用消息机制需要靠 Looper.prepare() 和 Looper.loop() 来建立消息队列、开始消息循环,那么什么是Looper?消息队列又是怎么实现的?
3.1 Looper
如下代码是精简过的 Looper 源码:
public class Looper {

    static final ThreadLocal<Looper> sThreadLocal = new ThreadLocal<Looper>();

    final MessageQueue mQueue;
    final Thread mThread;
    volatile boolean mRun;

    private Printer mLogging = null;

    public static void prepare() {
        if (sThreadLocal.get() != null) {
            throw new RuntimeException("Only one Looper may be created per thread");
        }
        sThreadLocal.set(new Looper());
    }
    private synchronized static void setMainLooper(Looper looper) {
        mMainLooper = looper;
    }

    public static void loop() {
        Looper me = myLooper();
        if (me == null) {
            throw new RuntimeException("No Looper; Looper.prepare() wasn't called on this thread.");
        }
        MessageQueue queue = me.mQueue;

        Binder.clearCallingIdentity();
        final long ident = Binder.clearCallingIdentity();

        while (true) {
            Message msg = queue.next(); // might block
            if (msg != null) {

                ......

                msg.target.dispatchMessage(msg);

                ......

                msg.recycle();
            }
        }
    }
}
毋庸置疑,MessageQueue 就是消息队列了,mThread 是该 Looper 所在的线程,ThreadLocal<Looper> sThreadLocal 中保存了各个线程对应的 Looper(ThreadLocal 可以存储每个线程独自占有的变量),prepare() 就是新建一个 Looper 并将其存储在 sThreadLocal 中,loop() 函数中一个大大的 while(true),一看就是消息循环了,图3.1展示了loop函数的处理流程。
<center>
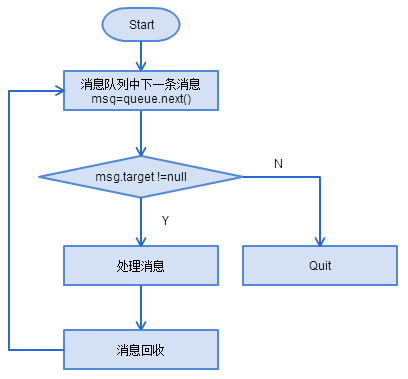
图 3.1 Looper.loop()处理流程图(Android4.0)</center>
其中,msg.target != null 的判断实际上就是判断是否退出消息循环,Looper.quit()的实现也就是发一个target为空的消息(即没有指定Handler的消息,不过这种退出的实现仅限于Android4.0,最新的实现已经变为标志位判断了,效率上算是略有提升):
public void quit() {
    Message msg = Message.obtain();
    mQueue.enqueueMessage(msg, 0);
}
3.2 MessageQueue
在说 MessageQueue 之前,我们现在来看下 Handler 如何发消息,这里引用下开发文档:
Scheduling messages is accomplished with the post(Runnable), postAtTime(Runnable, long), postDelayed(Runnable, long), sendEmptyMessage(int), sendMessage(Message), sendMessageAtTime(Message, long), and sendMessageDelayed(Message, long) methods. The post versions allow you to enqueue Runnable objects to be called by the message queue when they are received; the sendMessage versions allow you to enqueue a Message object containing a bundle of data that will be processed by the Handler's handleMessage(Message) method (requiring that you implement a subclass of Handler).
除了直接调用上述方法,我们还经常使用 Handler.obtainMessage(...).sendToTarget()。不管你是用哪个方法,最后都会执行到 sendMessageAtTime:
public boolean sendMessageAtTime(Message msg, long uptimeMillis)
{
    boolean sent = false;
    MessageQueue queue = mQueue;
    if (queue != null) {
        msg.target = this;
        sent = queue.enqueueMessage(msg, uptimeMillis);
    }
    else {
        RuntimeException e = new RuntimeException(
            this + " sendMessageAtTime() called with no mQueue");
        Log.w("Looper", e.getMessage(), e);
    }
    return sent;
}
简单一句话来描述就是将消息按照时间顺序插入到消息队列 MessageQueue 中,如下代码为我已经精简了的 MessageQueue:
public class MessageQueue {
    Message mMessages;
    private final ArrayList<IdleHandler> mIdleHandlers = new ArrayList<IdleHandler>();
    private IdleHandler[] mPendingIdleHandlers;

    private native void nativeInit();
    private native void nativeDestroy();
    private native void nativePollOnce(int ptr, int timeoutMillis);
    private native void nativeWake(int ptr);

    MessageQueue() {
        nativeInit();
    }

    final Message next() {
        ......
    }

    final boolean enqueueMessage(Message msg, long when) {
        ......
    }

    final boolean removeMessages(Handler h, int what, Object object,
            boolean doRemove) {
        ......
    }
}
mIdleHandlers、mPendingIdleHandlers 是在消息队列空闲时执行的一些操作,Message mMessages 是一个单向链表,永远指向链接的头(最早的消息),nativeInit、nativeDestroy 对应 native 层的初始化操作(用于来消息通知的管道初始化、销毁),nativePollOnce 和 nativeWake 对应 native 层等待、唤醒的逻辑,这些函数的作用和实现都会在后面详细讲述,next()、enqueueMessage(...)、removeMessages(...)就对应取消息、插入消息、移除消息三种操作。
3.2.1 MessageQueue.next()
next()就是上面提到的 Looper.loop() 流程中的获取下一个消息,图3.2展示了next()的流程大体为:
<center>
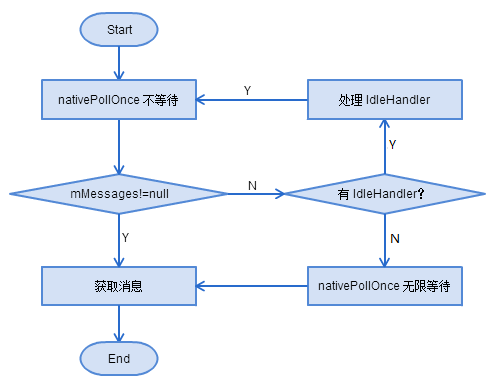
图 3.2 MessageQueue.next()处理流程图(Android4.0)</center>
代码如下所示:
final Message next() {
    int pendingIdleHandlerCount = -1; // -1 only during first iteration
    int nextPollTimeoutMillis = 0;

    for (;;) {
        ......
        nativePollOnce(mPtr, nextPollTimeoutMillis); // nextPollTimeoutMillis 为等待时间,若小于0则无限等待,若等于0则不等待

        synchronized (this) {
            // Try to retrieve the next message.  Return if found.
            final long now = SystemClock.uptimeMillis();
            final Message msg = mMessages;
            if (msg != null) { // 如果取到了消息
                final long when = msg.when;
                if (now >= when) { // 如果取到的消息时间正确
                    mBlocked = false;
                    mMessages = msg.next;
                    msg.next = null;
                    if (false) Log.v("MessageQueue", "Returning message: " + msg);
                    msg.markInUse();
                    return msg;
                } else { // 如果取到的消息时间不对
                    nextPollTimeoutMillis = (int) Math.min(when - now, Integer.MAX_VALUE);
                }
            } else { // 如果消息队列中无消息
                nextPollTimeoutMillis = -1;
            }

            ......

            if (pendingIdleHandlerCount == 0) {
                // 如果没有 idle handlers 要运行. 下次循环将会等待
                mBlocked = true;
                continue;
            }

            if (mPendingIdleHandlers == null) {
                mPendingIdleHandlers = new IdleHandler[Math.max(pendingIdleHandlerCount, 4)];
            }
            mPendingIdleHandlers = mIdleHandlers.toArray(mPendingIdleHandlers);
        }

        // Run the idle handlers.
        // We only ever reach this code block during the first iteration.
        for (int i = 0; i < pendingIdleHandlerCount; i++) {
            final IdleHandler idler = mPendingIdleHandlers[i];
            mPendingIdleHandlers[i] = null; // release the reference to the handler

            boolean keep = false;
            try {
                keep = idler.queueIdle();
            } catch (Throwable t) {
                Log.wtf("MessageQueue", "IdleHandler threw exception", t);
            }

            if (!keep) {
                synchronized (this) {
                    mIdleHandlers.remove(idler);
                }
            }
        }

        // Reset the idle handler count to 0 so we do not run them again.
        pendingIdleHandlerCount = 0;

        // While calling an idle handler, a new message could have been delivered
        // so go back and look again for a pending message without waiting.
        nextPollTimeoutMillis = 0;
    }
}
3.2.2 MessageQueue.enqueueMessage
前面说不管你是用哪个方法发消息,最后都会执行到 sendMessageAtTime,该方法核心操作就是 enqueueMessage(),该方法的逻辑不复杂,简单来说就是:按时间顺序将消息插入到合适位置并唤醒等待消息的线程(即执行 Looper.loop 的线程,实质上唤醒的是 nativePollOnce),如图 3.3 为 enqueueMessage() 的基本流程图:
<center>
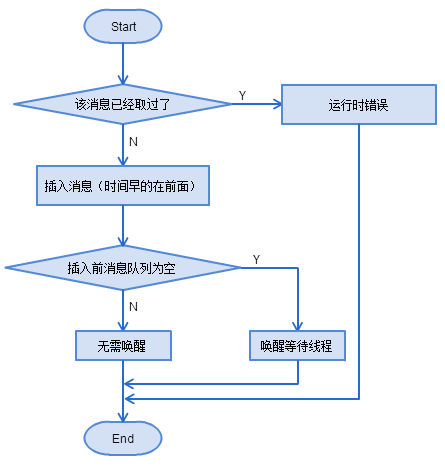
图 3.3 MessageQueue.enqueueMessage() 处理流程图(Android4.0)</center>
代码也比较简单,在这里索性都贴上,对照流程图和注释相信都可以看懂:
final boolean enqueueMessage(Message msg, long when) {
    if (msg.isInUse()) {
        throw new AndroidRuntimeException(msg
                + " This message is already in use.");
    }
    if (msg.target == null && !mQuitAllowed) { // target=null的消息表示要退出消息循环,
        throw new RuntimeException("Main thread not allowed to quit");
    }
    final boolean needWake;
    synchronized (this) {
        if (mQuiting) {
            RuntimeException e = new RuntimeException(
                msg.target + " sending message to a Handler on a dead thread");
            Log.w("MessageQueue", e.getMessage(), e);
            return false;
        } else if (msg.target == null) {
            mQuiting = true;
        }

        msg.when = when;
        //Log.d("MessageQueue", "Enqueing: " + msg);
        Message p = mMessages;
        if (p == null || when == 0 || when < p.when) { // 如果消息队列中是空的
            msg.next = p;
            mMessages = msg;
            needWake = mBlocked; // new head, might need to wake up
        } else { // 如果消息队列中不是空的
            Message prev = null;
            while (p != null && p.when <= when) { // 找到合适的插入位置
                prev = p;
                p = p.next;
            }
            msg.next = prev.next;
            prev.next = msg;
            needWake = false; // still waiting on head, no need to wake up
        }
    }
    if (needWake) {
        nativeWake(mPtr); // 唤醒Looper线程
    }
    return true;
}
4. 二级分析 - MainLooper
前面已经分析完了消息机制的几个重要的基本流程,到此为止也算是已经基本掌握了消息机制的用法,消息机制离不开 Looper,每个要用到消息循环的线程都需要用 Looper.prepare() 和 Looper.loop(),那么每个 Android 应用程序的进程在启动的时候主线程的 Looper 是谁负责的呢?从《通过 startService 在新进程中启动服务的流程(二)》中我们就可以了解到,ActivityThread 的 main 方法就是每个新进程的入口了,消息循环就是在这里:
public static void main(String[] args) {
    ......

    Looper.prepareMainLooper();
    if (sMainThreadHandler == null) {
        sMainThreadHandler = new Handler();
    }

    ActivityThread thread = new ActivityThread();
    thread.attach(false);

    if (false) {
        Looper.myLooper().setMessageLogging(new
                LogPrinter(Log.DEBUG, "ActivityThread"));
    }

    Looper.loop();

    throw new RuntimeException("Main thread loop unexpectedly exited");
}
4.1 主线程的 Looper
分析这个又看出了 4.0 的源码确实仍存在不少的 bug,在 Android 4.0 里,Looper 中有个静态字段 mMainLooper,这个命名本身就有问题,4.1的时候就被改为了 sMainLooper,我们这里用 4.0 源码来讲解,暂时仍叫它 mMainLooper。再来看这个 Looper.prepareMainLooper():
public static void prepareMainLooper() {
    prepare();
    setMainLooper(myLooper());
    myLooper().mQueue.mQuitAllowed = false;
}
可以看出,实际上就是调用了 prepare() 建立当前线程的 Looper 后,把该 Looper 赋值给 mMainLooper,并将该 Looper 设置为不可退出的。细心一点就可以看出问题,它根本就没有检查 mMainLooper 是否已经被赋值,4.0 上我们可以随意在一个非UI线程中执行 prepareMainLooper(),将非 UI 线程的 Looper 设置为 MainLooper,这肯定会导致后续指定 MainLooper 创建出来的 Handler 异常。在 4.1 里这个 bug 就已经改掉了:
public static void prepareMainLooper() {
    prepare(false);
    synchronized (Looper.class) {
        if (sMainLooper != null) {
            throw new IllegalStateException("The main Looper has already been prepared.");
        }
        sMainLooper = myLooper();
    }
}
4.2 推动主线程运行的消息
前面说到在主线程中默认就有一个消息循环永不退出,那么 Android 应用程序是靠谁发的消息推动运行的呢?Activity、Service等组件的生命周期又是对应哪些消息?这些消息又是谁主动发到主线程的呢?
非常明显的,如果我们的应用程序中只有一个线程,那必然就死掉了,因为没有别的线程会给主线程发消息,主线程的消息队列永远处于block状态,那么谁来扮演发送消息的角色呢?Binder 线程。
4.2.1 从 zygote 到 Binder 线程池
在 Android 每个应用进程启动的时候,至少会有一个 Binder 线程(本文不是讲Binder的,要想完全弄懂Binder也是相当耗时的事情,在这里力推罗升阳的博客),第一个Binder线程的创建是 Zygote fork 的子进程初始化时(在Android系统中,所有的应用程序进程以及系统服务进程 SystemServer 都是由Zygote进程孕育(fork)出来的),如图 4.1 简单展示了 Zygote 的初始化过程以及创建子进程的基本过程。
<center>
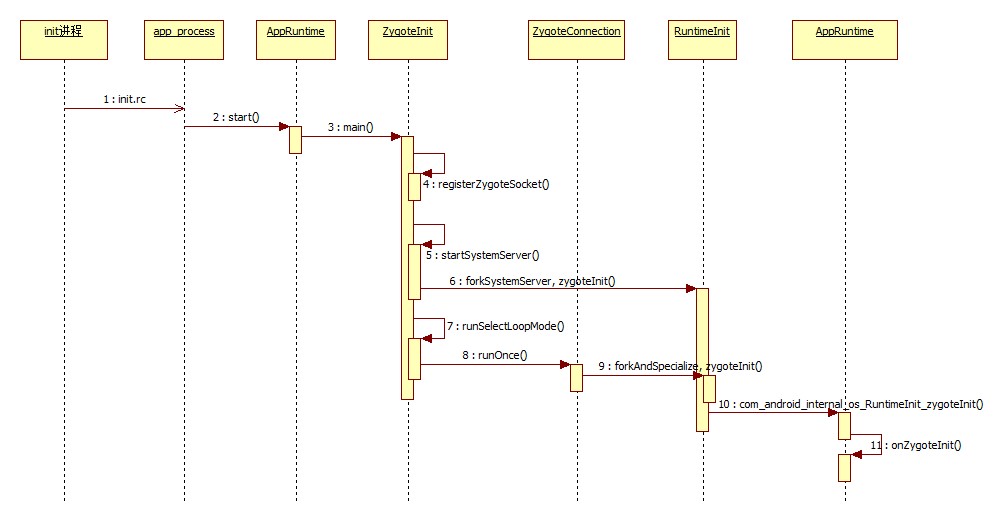
图 4.1 Zygote 的初始化过程以及创建子进程的基本过程(Android4.0)</center>
其中第4步是注册 zygote socket,第7步是不断检测该 socket 是否有请求,从《通过 startService 在新进程中启动服务的流程(一)》中我们可以了解到,新的进程是通过 Process.start("android.app.ActivityThread", ...) 来运行的,这个操作实际上是通过 localsocket 与 zygote 通信请求 fork 新进程,当检测到有请求时就会 fork 新进程并在子进程中执行 AndroidRunntime::onZygoteInit()方法,该(内联)方法实际在 framework/base/cmds/app_process/app_main.cpp 中:
virtual void onZygoteInit()
{
    sp<ProcessState> proc = ProcessState::self();
    LOGV("App process: starting thread pool.\n");
    proc->startThreadPool();
}
在这里就看到我们的目标:proc->startThreadPool(),这实际上就是创建一个 Binder 线程池。
4.2.2 Binder线程的创建
如图 4.2 所示为 Binder 线程池的创建过程时序图,可以看出每个应用程序都会在初始化时创建 Binder 线程池并在当前线程中执行线程独占(TLS)的 IPCThreadState::joinThreadPool()。
<center>
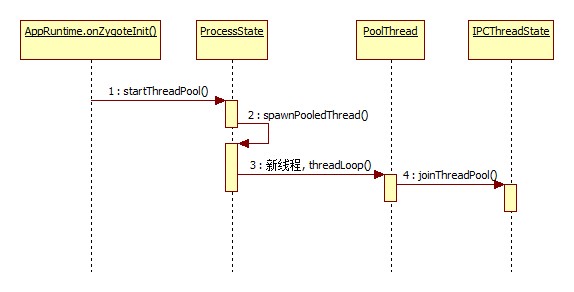
图 4.2 Binder 线程池创建流程(Android4.0)</center>
PoolThread 继承于 Android 实现的 Thread(关于 Thread 类,有兴趣的可以看看这篇文章),线程的运行主体其实是 threadLoop() 函数。ProcessState 和 IPCThreadState 均为单例模式,但是 IPCThreadState 是TLS的(如果一点不了解 pthread 的 TLS,大家可以看看这篇文章),如下为 IPCThreadState 的 self 方法:
IPCThreadState* IPCThreadState::self()
{
    if (gHaveTLS) {
restart:
        const pthread_key_t k = gTLS;
        IPCThreadState* st = (IPCThreadState*)pthread_getspecific(k);
        if (st) return st;
        return new IPCThreadState;
    }

    if (gShutdown) return NULL;

    pthread_mutex_lock(&gTLSMutex);
    if (!gHaveTLS) {
        if (pthread_key_create(&gTLS, threadDestructor) != 0) {
            pthread_mutex_unlock(&gTLSMutex);
            return NULL;
        }
        gHaveTLS = true;
    }
    pthread_mutex_unlock(&gTLSMutex);
    goto restart;
}
IPCThreadState.joinThreadPool() 函数实际就是不断的从 Binder 驱动中拿命令然后执行,如果是主Binder线程(应用程序开始运行时创建的第一个不会退出的Binder线程),如图 4.3 所示为该函数的基本流程图:
<center>
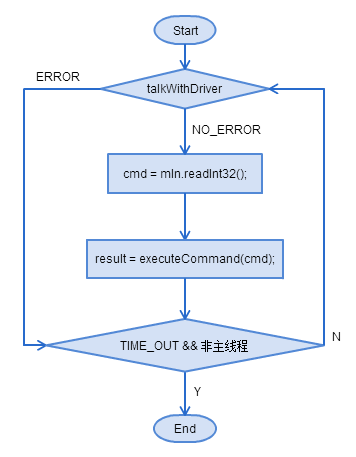
图 4.3 joinThreadPool() 基本流程(Android4.0)</center>
当 Binder 驱动检测到有 binder 调用时,会发一个 BR_SPAWN_LOOPER 命令使其创建新的线程:
status_t IPCThreadState::executeCommand(int32_t cmd)
{
    ......

    switch (cmd) {

    ......

    case BR_SPAWN_LOOPER:
        mProcess->spawnPooledThread(false);
        break;

    ......

    }
}
以上就是第一个 Binder 线程的创建和其他 Binder 线程创建的流程了。
4.2.3 (举例)推动App运行的消息 - 通过 Service 的生命周期函数来说明
我们回忆一下《通过 startService 在新进程中启动服务的流程(二)》中提到的从新进程创建到 Service.onStartCommand 函数执行的总体流程,可以画出下面的一张图:
<center>
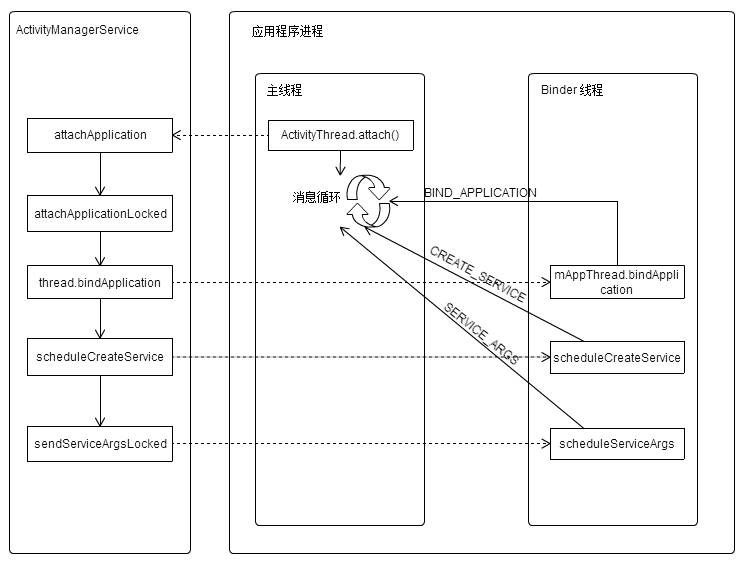
图 4.4 从新进程创建到 Service.onStartCommand 函数执行的流程中的关键消息(Android4.0)</center>
从图 4.4 可以看出,应用程序初始化(消息-BIND_APPLICATION)、Service.onCreate(消息-CREATE_SERVICE)、Service.onStartCommand(消息-SERVICE_ARGS) 的消息均是靠binder线程传过去的,也只有这样主线程才会继续正常不停地运作。应用程序进程在主线程的工作可以用图中两点概括:attach 和 looper。attach 是往 AMS 中 attach 一个类型为 ApplicationThread 的 Binder 对象,在 AMS 中会依次调用该 Binder 对象的 bindApplication、scheduleCreateService、scheduleServiceArgs 接口,然后会发送消息到主线程(H)中执行应用程序的初始化,消息和处理函数对应为 BIND_APPLICATION - handleBindApplication、CREATE_SERVICE - handleCreateService、SERVICE_ARGS - handleServiceArgs。
5. 三级分析 - 消息循环的等待与唤醒
至此我们已经能够理解消息循环的重要性与实用性了,那么这节进一步深入理解消息循环的基础实现。第三小节我们已经提到了 MessageQueue.next 方法的基本流程,知道了 nativePollOnce 是会阻塞的,那么它是在哪一步阻塞的?阻塞的线程是如何被唤醒的?为何是在 native 去做阻塞和唤醒而不是在java层做呢?本小节实际是对 3.2 节进一步展开分析。
5.1 nativePollOnce
从 3.2.1 中我们了解到,在 MessageQueue.next() 过程中如果没有取到消息,且也没有 IdleHandler 可以执行时,下次 nativePollOnce 就会无限等待即阻塞,那么在 native 层里这个函数是阻塞在了哪一步呢?
nativePollOnce 函数原型为:
private native void nativePollOnce(int ptr, int timeoutMillis);
其中 timeoutMillis 即阻塞等待的时间,若为 -1 则是无限等待,若为 0 则是不等待,该函数对应的 JNI 函数是在 /framework/base/core/jni/android_os_MessageQueue.cpp 中:
static void android_os_MessageQueue_nativePollOnce(JNIEnv* env, jobject obj, jint ptr, jint timeoutMillis) {
    NativeMessageQueue* nativeMessageQueue = reinterpret_cast<NativeMessageQueue*>(ptr);
    nativeMessageQueue->pollOnce(timeoutMillis);
}
如图 5.1 所示为 native 层中 nativePollOnce 的调用流程:
<center>
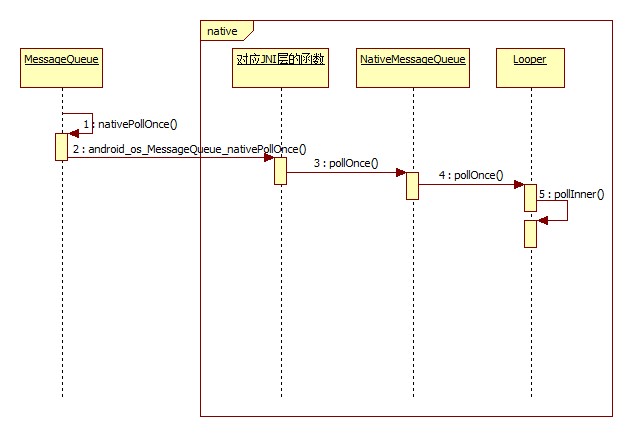
图 5.1 nativePollOnce 的调用流程(Android4.0)</center>
可以看到 native 层也有对应的 NativeMessageQueue 和 Looper,但是与 java 层不同的是,java 层中是 Looper 调用 MessageQueue,而 native 层中是 NativeMessageQueue 调用 Looper,而且 NativeMessageQueue 也不是字面意义上的消息队列(因为它没有消息对象),来看下 NativeMessageQueue 的声明就能看出来:
class NativeMessageQueue {
public:
    NativeMessageQueue();
    ~NativeMessageQueue();

    inline sp<Looper> getLooper() { return mLooper; }

    void pollOnce(int timeoutMillis);
    void wake();

private:
    sp<Looper> mLooper;
};
这里的 sp<?> 是 Android 里实现的智能指针,sp<Looper> mLooper 可以理解为 Looper* mLooper,看下 NativeMessageQueue 的构造函数:
NativeMessageQueue::NativeMessageQueue() {
    mLooper = Looper::getForThread();
    if (mLooper == NULL) {
        mLooper = new Looper(false);
        Looper::setForThread(mLooper);
    }
}

sp<Looper> Looper::getForThread() {
    int result = pthread_once(& gTLSOnce, initTLSKey);
    LOG_ALWAYS_FATAL_IF(result != 0, "pthread_once failed");

    return (Looper*)pthread_getspecific(gTLSKey);
}
可以看出 mLooper 也是线程独占(TLS)的单例模式。
NativeMessageQueue.pollOnce() 实际是调用 Looper.pollOnce(),然后调用 Looper.pollInner(),我们在看 pollInner 之前先来看下 Looper 的构造函数:
Looper::Looper(bool allowNonCallbacks) :
    mAllowNonCallbacks(allowNonCallbacks), mSendingMessage(false),
    mResponseIndex(0), mNextMessageUptime(LLONG_MAX) {
    int wakeFds[2];
    int result = pipe(wakeFds);
    LOG_ALWAYS_FATAL_IF(result != 0, "Could not create wake pipe.  errno=%d", errno);

    mWakeReadPipeFd = wakeFds[0];
    mWakeWritePipeFd = wakeFds[1];

    result = fcntl(mWakeReadPipeFd, F_SETFL, O_NONBLOCK);
    LOG_ALWAYS_FATAL_IF(result != 0, "Could not make wake read pipe non-blocking.  errno=%d",
            errno);

    result = fcntl(mWakeWritePipeFd, F_SETFL, O_NONBLOCK);
    LOG_ALWAYS_FATAL_IF(result != 0, "Could not make wake write pipe non-blocking.  errno=%d",
            errno);

#ifdef LOOPER_USES_EPOLL
    // Allocate the epoll instance and register the wake pipe.
    mEpollFd = epoll_create(EPOLL_SIZE_HINT);
    LOG_ALWAYS_FATAL_IF(mEpollFd < 0, "Could not create epoll instance.  errno=%d", errno);

    struct epoll_event eventItem;
    memset(& eventItem, 0, sizeof(epoll_event)); // zero out unused members of data field union
    eventItem.events = EPOLLIN;
    eventItem.data.fd = mWakeReadPipeFd;
    result = epoll_ctl(mEpollFd, EPOLL_CTL_ADD, mWakeReadPipeFd, & eventItem);
    LOG_ALWAYS_FATAL_IF(result != 0, "Could not add wake read pipe to epoll instance.  errno=%d",
            errno);
#else
    ......
#endif
    ......
}
可以看出 Looper 的构造函数主要干了两件事:创建管道(有关 pipe 的介绍可以参考这篇文章)和初始化 epoll 实例(有关 epoll 的函数有三个:epoll_create、epoll_ctl、epoll_wait,有关 I/O、epoll 的介绍可以参考这篇文章),但在这里 epoll 监听的可不只是这一个管道的读端(如上面代码所示 epoll_ctl 的调用,第三个参数是 mWakeReadPipeFd),还支持添加监听指定的 FD:
int Looper::addFd(int fd, int ident, int events, ALooper_callbackFunc callback, void* data) {
    ......
#ifdef LOOPER_USES_EPOLL
    int epollEvents = 0;
    if (events & ALOOPER_EVENT_INPUT) epollEvents |= EPOLLIN;
    if (events & ALOOPER_EVENT_OUTPUT) epollEvents |= EPOLLOUT;

    { // acquire lock
        AutoMutex _l(mLock);

        Request request;
        request.fd = fd;
        request.ident = ident;
        request.callback = callback;
        request.data = data;

        struct epoll_event eventItem;
        memset(& eventItem, 0, sizeof(epoll_event)); // zero out unused members of data field union
        eventItem.events = epollEvents;
        eventItem.data.fd = fd;

        ssize_t requestIndex = mRequests.indexOfKey(fd);
        if (requestIndex < 0) {
            int epollResult = epoll_ctl(mEpollFd, EPOLL_CTL_ADD, fd, & eventItem);
            if (epollResult < 0) {
                LOGE("Error adding epoll events for fd %d, errno=%d", fd, errno);
                return -1;
            }
            mRequests.add(fd, request);
        } else {
            int epollResult = epoll_ctl(mEpollFd, EPOLL_CTL_MOD, fd, & eventItem);
            if (epollResult < 0) {
                LOGE("Error modifying epoll events for fd %d, errno=%d", fd, errno);
                return -1;
            }
            mRequests.replaceValueAt(requestIndex, request);
        }
    } // release lock
#else
    ......
#endif
    return 1;
}
如 InputChannel 的注册过程就是靠 Looper 的 epoll 去监听管道事件,大家可以参考这篇文章。
了解了 Looper 的构造,下面来看下 PollInner 这个函数,如下代码段为该函数的精简版:
int Looper::pollInner(int timeoutMillis) {
    ......
#ifdef LOOPER_USES_EPOLL
    struct epoll_event eventItems[EPOLL_MAX_EVENTS];
    int eventCount = epoll_wait(mEpollFd, eventItems, EPOLL_MAX_EVENTS, timeoutMillis);
#else
    ......
#endif

    // Acquire lock.
    mLock.lock();

    // Check for poll error.
    if (eventCount < 0) {
        if (errno == EINTR) {
            goto Done;
        }
        LOGW("Poll failed with an unexpected error, errno=%d", errno);
        result = ALOOPER_POLL_ERROR;
        goto Done;
    }

    // Check for poll timeout.
    if (eventCount == 0) {
        ......
        result = ALOOPER_POLL_TIMEOUT;
        goto Done;
    }
    ......

#ifdef LOOPER_USES_EPOLL
    for (int i = 0; i < eventCount; i++) {
        int fd = eventItems[i].data.fd;
        uint32_t epollEvents = eventItems[i].events;
        if (fd == mWakeReadPipeFd) {
            if (epollEvents & EPOLLIN) {
                awoken();
            } else {
                LOGW("Ignoring unexpected epoll events 0x%x on wake read pipe.", epollEvents);
            }
        } else {
            ......
        }
    }
Done: ;
#else
    ......
#endif
    ......
    return result;
}
epoll_wait 即开始监听,eventItems 即监听的事件数组,epoll_wait 的返回值即监听到的事件的数量,eventCount < 0 时即出错,当监听到有事件时,通过 eventItems[i].data.fd 取得发生事件的 fd,判断是否是 mWakeReadPipeFd,如果是 则说明消息队列里有消息了(下一节会讲插入消息的过程),执行 awoken 函数读取管道中的数据(目的是清除管道中传来的数据):
void Looper::awoken() {
    ......
    char buffer[16];
    ssize_t nRead;
    do {
        nRead = read(mWakeReadPipeFd, buffer, sizeof(buffer));
    } while ((nRead == -1 && errno == EINTR) || nRead == sizeof(buffer));
}
此时相当于线程从 nativePollOnce 中醒来了。
5.2 enqueueMessage
如图 5.2 为有消息插入时,即 MessageQueue 的 enqueueMessage() 方法的native流程:
<center>
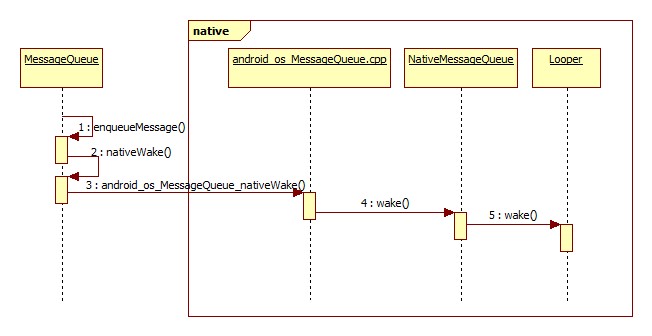
图 5.2 enqueueMessage 的调用流程(Android4.0)</center>
enqueueMessage 在将 Message 对象插入到队列中后执行 nativeWake(),对应 android_os_MessageQueue.cpp 中的 android_os_MessageQueue_nativeWake() 函数,然后是 NativeMessageQueue 的 wake() 函数,最后调到 Looper 的 wake() 函数,调用关系跟 nativePollOnce 基本一致,来看下 Looper 的 wake() 函数:
void Looper::wake() {
    ......
    ssize_t nWrite;
    do {
        nWrite = write(mWakeWritePipeFd, "W", 1);
    } while (nWrite == -1 && errno == EINTR);

    if (nWrite != 1) {
        if (errno != EAGAIN) {
            LOGW("Could not write wake signal, errno=%d", errno);
        }
    }
}
可以发现其实就是像管道的写端(mWakeWritePipeFd)写入一个字符 “W”,目的其实就是为了唤醒阻塞的 nativePollOnce,触发 5.1 节所说的 epoll_wait 调用返回。
到此,就已经把消息循环中收/发消息的基本流程分析完了。
6. 小结
本文首先介绍了 android 消息机制中重要的类 Handler、Looper 的正确用法,然后从 Android 主线程的运行入手,逐步深入分析了消息循环是如何发挥作用,线程间又是如何相互影响、唤醒等待消息方的。底层原理总结起来就是:java层消息队列无消息时,native层靠监听管道读端 epoll_wait 阻塞运行,当消息队列插入消息时,会往管道写端插入一个字符,通知管道读一方有消息了,读方检测到管道有事件被唤醒继续运行,到java层读取消息。