通过 startService 在新进程中启动服务的流程(一)
Android 启动 Service 的方式有两种:startService 和 bindService,本文通过分析 Android 源码对 startService 流程中比较重要的几个点进行展开。
1. 基本流程
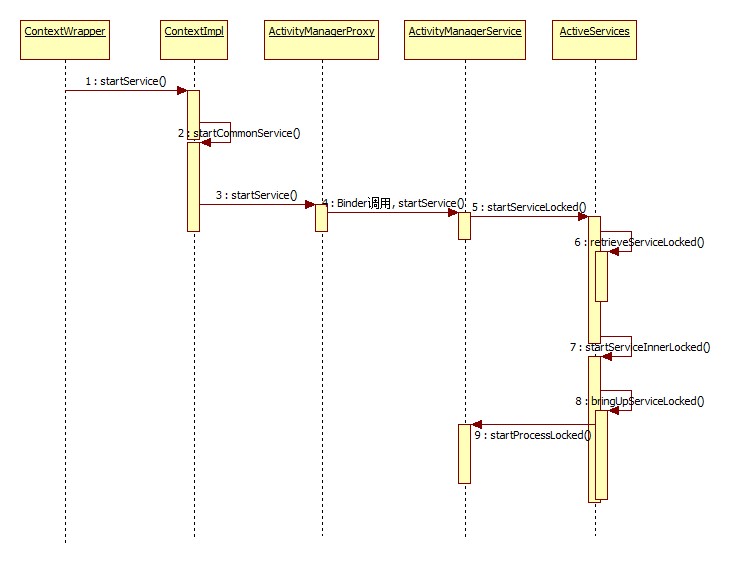
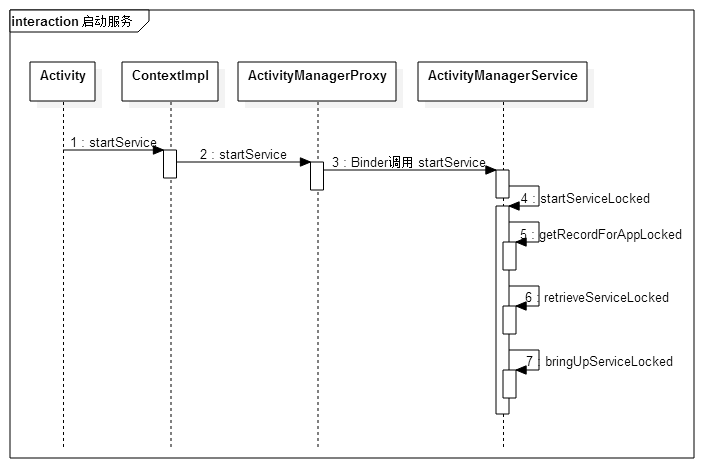
每当系统决定在新进程中启动一个Activity或者Service的时候,ActivityManagerService(下面统称 AMS)会通过调用 startProcessLocked 函数为应用程序启动新的进程,图 1.1 和图 1.2 分别为 Android 4.4 和 Android 4.0 在新进程中起一个Service的过程(实际上4.2之前的版本,AMS 都是通过调用自己的startServiceLocked,从4.2开始 startServiceLocked 是 ActiveServices 的一个函数,AMS 中则包含一个 ActiveServices 的字段 mServices,转而调用 mServices.startServiceLocked 方法)。
<center>

图 1.1 context.startService 基本流程时序图(Android4.4)</center>
<center>

图 1.2 context.startService 基本流程时序图(Android4.0)</center>
为简单起见,我们通过 Android 4.0 源码来说明,从图 1.2 可以看出,关键流程有 7 个,其中1、2均为简单的调用,源码一看便知,3为Binder远程调用,其具体实现不在本文的程序启动流程讨论范围内。我们只需要关注 ActivityManagerService.startServiceLocked 该方法,即流程 5-7 即可。
2. 验证startService调用者进程是否存在
本节讨论的即图 1.2 中的流程 5,AMS 在执行 startServiceLocked 时首先要确定调用者是否还存在,如果不存在将会抛出 SecurityException 的异常,如下为对应的源码(frameworks/base/services/java/com/android/server/am/ActivityManagerService.java):
ComponentName startServiceLocked(IApplicationThread caller,
                                 Intent service,
                                 String resolvedType,
                                 int callingPid,
                                 int callingUid) { // 这个排版当然不是 Android 源码的
    synchronized(this) {
        if (DEBUG_SERVICE) Slog.v(TAG, "startService: " + service
                + " type=" + resolvedType + " args=" + service.getExtras());

        if (caller != null) {
            final ProcessRecord callerApp = getRecordForAppLocked(caller);
            if (callerApp == null) {
                throw new SecurityException(
                        "Unable to find app for caller " + caller
                        + " (pid=" + Binder.getCallingPid()
                        + ") when starting service " + service);
            }
        }

        ......

    }
}
从上面的代码可以看出 AMS 通过 getRecordForAppLocked 获取(当前运行的进程中)对应调用者的 ProcessRecord 对象,该函数展开如下源码:
final ProcessRecord getRecordForAppLocked(
        IApplicationThread thread) {
    if (thread == null) {
        return null;
    }

    int appIndex = getLRURecordIndexForAppLocked(thread);
    return appIndex >= 0 ? mLruProcesses.get(appIndex) : null;
}

private final int getLRURecordIndexForAppLocked(IApplicationThread thread) {
    IBinder threadBinder = thread.asBinder();

    // Find the application record.
    for (int i=mLruProcesses.size()-1; i>=0; i--) {
        ProcessRecord rec = mLruProcesses.get(i);
        if (rec.thread != null && rec.thread.asBinder() == threadBinder) {
            return i;
        }
    }
    return -1;
}
通过比对 IBinder 对象是否一样来判断是否是该调用者的 ProcessRecord(至于为什么这样判断在谈到 ActivityThread 时再说),这里用到一个字段 mLruProcesses,它包含了所有当前运行的程序的 ProcessRecord 对象,每当一个新(app)进程被启动时, ActivityThread 就会被创建(实际上会被直接 Process.start 执行),并往 mLruProcesses 中插入自己的 ProcessRecord 对象,这点在分析 ActivityThread.attach 过程时还会提到。
3. retrieveServiceLocked 如何查找/创建该服务对应的 ServiceRecord
在检查完调用者存在对应进程后,通过 retrieveServiceLocked 函数解析传来的 Intent 对象并生成一个 ServiceLookupResult 对象(包含一个 ServiceRecord 对象):
ComponentName startServiceLocked(IApplicationThread caller,
                                 Intent service,
                                 String resolvedType,
                                 int callingPid,
                                 int callingUid) {
    synchronized(this) {

        ......

        ServiceLookupResult res =
            retrieveServiceLocked(service, resolvedType,
                    callingPid, callingUid);
        if (res == null) {
            return null;
        }
        if (res.record == null) {
            return new ComponentName("!", res.permission != null
                    ? res.permission : "private to package");
        }
        ServiceRecord r = res.record;

        ......

    }
}
startServiceLocked 函数返回类型是 ComponentName,直接返回给ContextImpl之后再判断该ComponentName 是否可用,只有当找不到指定 Service 或者 system_server 出什么异常时 startServiceLocked 才会返回一个 null,如果指定的是没有导出的服务,会返回一个包名为“!”(这是个很有意思的细节)的 ComponentName,如下 ContextImpl 源码(frameworks/base/core/java/android/app/ContextImpl.java):
if (cn != null && cn.getPackageName().equals("!")) {
    throw new SecurityException(
        "Not allowed to start service " + service + " without permission " + cn.getClassName());
}
3.1 ServiceRecord 的基本信息
ServiceRecord,我们可以称之服务记录,也可以叫服务描述符,每一个运行中的服务都会在 AMS 的 HashMap<ComponentName, ServiceRecord> mServices 字段中存储一份自己的 ServiceRecord,该类记录了一个 Service 的状态信息,其中包括:
1. final ActivityManagerService ams;
2. final BatteryStatsImpl.Uid.Pkg.Serv stats; //可以获取服务启动所耗时间、被启动的次数、被调用的次数
3. final ComponentName name; //此服务组件名信息
4. final String shortName; //服务名 name.flattenToShortString().
5. final Intent.FilterComparison intent; //用来搜寻该服务的原始 intent。original intent used to find service.
6. final ServiceInfo serviceInfo; //记录了该服务的所有信息,继承于ComponentInfo,包含了进程名、applicationInfo、权限、启动的FLAG等。all information about the service.
7. final ApplicationInfo appInfo; //应用程序信息
8. final String packageName;
9. final String processName;
10. final String permission;// permission needed to access service
11. final String baseDir;
        ServiceInfo.applicationInfo.sourceDir;
12. final String resDir;
        ServiceInfo.applicationInfo.publicSourceDir;
13. final String dataDir;
        ServiceInfo.applicationInfo.dataDir;
14. final boolean exported; // from ServiceInfo.exported
15. final Runnable restarter; // used to schedule retries of starting the service
16. final long createTime; //服务创建时间
17. final HashMap<Intent.FilterComparison, IntentBindRecord> bindings
                                    = new HashMap<Intent.FilterComparison, IntentBindRecord>();
        所有激活的binding
18. final HashMap<IBinder, ArrayList<ConnectionRecord>> connections
                                    = new HashMap<IBinder, ArrayList<ConnectionRecord>>(); //所有绑定的Client的连接信息
19. ProcessRecord app; //服务所在进程信息
20. boolean isForeground; //是否是前台服务
21. int foregroundId; //前台服务对应的通知的id
22. Notification foregroundNoti; //前台服务时的通知
23. long lastActivity; // last time there was some activity on the service.
24. boolean startRequested; //该服务是否被startService了
25. boolean stopIfKilled; // last onStart() said to stop if service killed?
26. boolean callStart; // last onStart() has asked to alway be called on restart.
27. int executeNesting; // number of outstanding operations keeping foreground.
28. long executingStart; // start time of last execute request. 最近一次请求开始的时间
29. int crashCount; //服务启动后进程crash的次数
30. int totalRestartCount; // number of times we have had to restart.
31. int restartCount; // number of restarts performed in a row.
32. long restartDelay; // delay until next restart attempt.
33. long restartTime; //上次重启时间
34. long nextRestartTime; // time when restartDelay will expire.
35. private int lastStartId; // identifier of most recent start request.
以上这些字段。
3.2 查询要启动的服务是否为当前运行中的服务
retrieveServiceLocked 方法首先要从当前已经运行的服务中查找是否已经存在该 Intent 对应的 ServiceRecord,若没有再去新建新服务,如下源码所示(frameworks/base/services/java/com/android/server/am/ActivityManagerService.java):
  private ServiceLookupResult retrieveServiceLocked(Intent service,
          String resolvedType, int callingPid, int callingUid) {
      ServiceRecord r = null;
      if (service.getComponent() != null) {
1.        r = mServices.get(service.getComponent());
      }
      Intent.FilterComparison filter = new Intent.FilterComparison(service);
2.    r = mServicesByIntent.get(filter);
      if (r == null) {

          ...... // 在下一小节展开

      }

      ......

  }
这里查找源有两处:mServices 和 mServicesByIntent,mServices 是以 ComponentName 为 Key 的一个 HashMap,Value 类型是 ServiceRecord,mServicesByIntent 则是以 Intent.FilterComparison 为 Key 的 HashMap,Intent.FilterComparison 实际上就是将 Intent 的属性包装了一下,重写 equals、hashcode 方法用于存储和查找。
这段是很奇葩的一个写法,不管你是否在 mServices 中查找到对应 ServiceRecord(步骤1),都会重新在 mServicesByIntent 中再查一次覆盖掉(步骤2),目前还没明白为何这样写,一直觉得应该写成下面这样:
ServiceRecord r = null;
if (service.getComponent() != null) {
    r = mServices.get(service.getComponent());
}
if (r == null) {
    Intent.FilterComparison filter = new Intent.FilterComparison(service);
    r = mServicesByIntent.get(filter);
}
而且后来发现,在 4.1 上就已经改过来了,暂且认为这是 4.0 系统的一个效率问题 bug 吧。
3.3 若非已经运行的服务,则解析 Intent 并创建一个 ServiceRecord
在 mServices 和 mServicesByIntent 中都没有指定服务时,AMS 会创建一个新的 ServiceRecord,这个过程可以分为四个步骤来讲:1. 解析 Intent,2. 构造 ComponentName 再次查找,3. 构造 ServiceRecord,4. 检查该服务对调用者的权限限制。
3.3.1 解析 Intent
if (r == null) {
    try {
        ResolveInfo rInfo =
                AppGlobals.getPackageManager().resolveService(
                        service, resolvedType, STOCK_PM_FLAGS);
        ServiceInfo sInfo =
                rInfo != null ? rInfo.serviceInfo : null;
        if (sInfo == null) {
            Slog.w(TAG, "Unable to start service " + service +
                      ": not found");
            return null;
        }

        ...... // 在下一小节展开

    } catch (RemoteException ex) { ...... }
}
ResolveInfo 包含了解析 Intent 获得的服务信息 ServiceInfo 在内的信息,通过 PackageManagerService(以下统称 PMS)提供的公共接口resolveService 对 Intent 解析获取对应的服务(该对外公共接口的实现在此不再赘述)。提上一句,和 queryIntent* 类型的函数不同的是,有些隐式 Intent 若对应多个服务,那么它会只取第一个返回,那么通过隐式 Intent 启动的 Service 其实就是符合 Intent 的服务列表的第一个。
当发现通过该 Intent 没有查找到任何服务组件,则让 retrieveServiceLocked 返回 null。
3.3.2 构造 ComponentName 再次查找
不管是通过 startService 还是 bindService,启动的服务都会存在 AMS 的 mServices 和 mServicesByIntent 字段中,若启动服务的 Intent 为隐式,则 getComponent() 获取为 null(无法在 mServices 中查找),而且很有可能在 mServicesByIntent 中查找不到对应的服务记录,AMS 会根据解析 Intent 查找到的服务组件信息创建一个 ComponentName 再次去 mServices 中查找一次。如下源码:
ComponentName name = new ComponentName(
                    sInfo.applicationInfo.packageName, sInfo.name);
r = mServices.get(name);
if (r == null) {

    ...... // 在下一小节展开

}
3.3.3 构造 ServiceRecord
若仍然在 mServices 中查不到对应 ServiceRecord,则创建一个新的,新创建的 ServiceRecord 在 mServices 和 mServicesByIntent 中各存一份。这个流程中包括了 BatteryStatsImpl 的创建,BatteryStatsImpl 相关的内容将在电量统计的文章中涉及到,在此不再赘述。源码如下:
if (r == null) {
    filter = new Intent.FilterComparison(service.cloneFilter());
    ServiceRestarter res = new ServiceRestarter();
    BatteryStatsImpl.Uid.Pkg.Serv ss = null;
    BatteryStatsImpl stats = mBatteryStatsService.getActiveStatistics();
    synchronized (stats) {
        ss = stats.getServiceStatsLocked(
                sInfo.applicationInfo.uid, sInfo.packageName,
                sInfo.name);
    }
    r = new ServiceRecord(this, ss, name, filter, sInfo, res);
    res.setService(r);
    mServices.put(name, r);
    mServicesByIntent.put(filter, r);

    ...... // 后面展开

}
而后
// Make sure this component isn't in the pending list.
int N = mPendingServices.size();
for (int i=0; i<N; i++) {
    ServiceRecord pr = mPendingServices.get(i);
    if (pr.name.equals(name)) {
        mPendingServices.remove(i);
        i--;
        N--;
    }
}
3.3.4 检查该服务对调用者的权限限制
在查找/创建 ServiceRecord 后,将会分析该服务的权限限制,并判断调用者是否有权限启动该服务,若无权限,retrieveServiceLocked 则返回一个不包含 ServiceRecord 的 ServiceLookupResult 对象,并附上权限说明。源码如下:
if (r != null) {
    if (checkComponentPermission(r.permission,
            callingPid, callingUid, r.appInfo.uid, r.exported)
            != PackageManager.PERMISSION_GRANTED) {
        if (!r.exported) {
            Slog.w(TAG, "Permission Denial: Accessing service " + r.name
                + " from pid=" + callingPid
                + ", uid=" + callingUid
                + " that is not exported from uid " + r.appInfo.uid);
            return new ServiceLookupResult(null, "not exported from uid "
                + r.appInfo.uid);
         }
         Slog.w(TAG, "Permission Denial: Accessing service " + r.name
             + " from pid=" + callingPid
             + ", uid=" + callingUid
             + " requires " + r.permission);
         return new ServiceLookupResult(null, r.permission);
    }
    return new ServiceLookupResult(r, null);
}
checkComponentPermission 的具体细节将在“Android 调用者权限验证”中具体展开。
3.3.5 本节小结
本节主要分析了 retrieveServiceLocked 函数的流程,返回的是包装了 ServiceRecord 和 权限说明的对象 ServiceLookupResult,主要是为了查找传入的 Intent 对应的正在运行或已经安装的服务,查找源有二:AMS 中的 mServices(正在运行中的服务)和 PMS 中的 mServices(已经安装服务的解析类)。
4. bringUpServiceLocked 基本流程
经过第三节的分析,我们知道 AMS 通过 retrieveServiceLocked() 获取指定 Intent 对应的 ServiceRecord,接下来该节将分析如何在新进程中启动的该服务。该过程分三大步:更新 ServiceRecord 的字段、bringUpServiceLocked、startProcessLocked。
4.1 更新 ServiceRecord 的字段
通过下面的代码可以看出首先是要通过 checkGrantUriPermissionFromIntentLocked 方法拿到一个验证权限的结果,该方法实际上去通过验证 Intent 中的 Uri 是否有读写权限来判断的,在这里我们可以忽略这个步骤,然后对 ServiceRecord 的 startRequest、callStart、pendingStarts、lastActivity 分别赋值,最后传入 bringUpServiceLocked 中继续运行。
ComponentName startServiceLocked(IApplicationThread caller,
        Intent service, String resolvedType,
        int callingPid, int callingUid) {
    synchronized(this) {

        ......

        ServiceRecord r = res.record;
        int targetPermissionUid = checkGrantUriPermissionFromIntentLocked(
                callingUid, r.packageName, service);
        if (unscheduleServiceRestartLocked(r)) {
            if (DEBUG_SERVICE) Slog.v(TAG, "START SERVICE WHILE RESTART PENDING: " + r);
        }
        r.startRequested = true;
        r.callStart = false;
        r.pendingStarts.add(new ServiceRecord.StartItem(r, false, r.makeNextStartId(),
                service, targetPermissionUid));
        r.lastActivity = SystemClock.uptimeMillis();
        synchronized (r.stats.getBatteryStats()) {
            r.stats.startRunningLocked();
        }
        if (!bringUpServiceLocked(r, service.getFlags(), false)) {
            return new ComponentName("!", "Service process is bad");
        }
        return r.name;
    }
}
4.2 执行 bringUpServiceLocked
首先,判断该服务是否已经在运行,如果是已经运行的服务则执行 sendServiceArgsLocked 方法,其会让该服务执行 onStartCommand,sendServiceArgsLocked 方法在这里具体先不展开:
private final boolean bringUpServiceLocked(ServiceRecord r,
        int intentFlags, boolean whileRestarting) {
    //Slog.i(TAG, "Bring up service:");
    //r.dump("  ");

    if (r.app != null && r.app.thread != null) {
        sendServiceArgsLocked(r, false);
        return true;
    }

    if (DEBUG_SERVICE) Slog.v(TAG, "Bringing up " + r + " " + r.intent);

    // We are now bringing the service up, so no longer in the
    // restarting state.
    mRestartingServices.remove(r);

    ......

}
上面的代码最后一行 mRestartingServices.remove(r) 是将要启动的服务从“被系统干掉或者自己crash后即将自己重启的服务列表”中移除。
如果服务未在运行,则会启动该服务,在此之前需要确定该服务运行在哪个目标进程,如果目标进程已经存在,则直接在该进程中运行服务,如下代码所示,realStartServiceLocked 为启动该服务的真正方法:
private final boolean bringUpServiceLocked(ServiceRecord r,
        int intentFlags, boolean whileRestarting) {

    ......

    final String appName = r.processName;
    ProcessRecord app = getProcessRecordLocked(appName, r.appInfo.uid);
    if (app != null && app.thread != null) {
        try {
            app.addPackage(r.appInfo.packageName);
            realStartServiceLocked(r, app);
            return true;
        } catch (RemoteException e) {
            Slog.w(TAG, "Exception when starting service " + r.shortName, e);
        }

        // If a dead object exception was thrown -- fall through to
        // restart the application.
    }

    ......

}
如果目标进程未再运行,则会启动一个新的进程,然后在此进程中运行服务:
private final boolean bringUpServiceLocked(ServiceRecord r,
        int intentFlags, boolean whileRestarting) {

    ......

    // Not running -- get it started, and enqueue this service record
    // to be executed when the app comes up.
    if (startProcessLocked(appName, r.appInfo, true, intentFlags,
            "service", r.name, false) == null) {
        Slog.w(TAG, "Unable to launch app "
                + r.appInfo.packageName + "/"
                + r.appInfo.uid + " for service "
                + r.intent.getIntent() + ": process is bad");
        bringDownServiceLocked(r, true);
        return false;
    }

    if (!mPendingServices.contains(r)) {
        mPendingServices.add(r);
    }

    ......

}
4.3 执行 startProcessLocked
在函数 startProcessLocked 中,先根据传进来的进程名、应用信息创建一个 ProcessRecord,然后重载的另一个 startProcessLocked 启动进程:
final ProcessRecord startProcessLocked(String processName, ApplicationInfo info, boolean knownToBeDead, int intentFlags, String hostingType, ComponentName hostingName, boolean allowWhileBooting) {

    ......

    if (app == null) {
        app = newProcessRecordLocked(null, info, processName);
        mProcessNames.put(processName, info.uid, app);
    } else {
        // If this is a new package in the process, add the package to the list
        app.addPackage(info.packageName);
    }

    ......

    startProcessLocked(app, hostingType, hostingNameStr);
    return (app.pid != 0) ? app : null;
}
在重载的 startProcessLocked 中,会根据初始化好的 uid、processName、gids、debugflags 使用 Process.start 启动指定进程,然后在 mPidsSelfLocked 中插入对应的 ProcessRecord,同时也会有超时判断与处理:
private final void startProcessLocked(ProcessRecord app,
        String hostingType, String hostingNameStr) {

    ...... // 初始化 uid、gids、debugflags

    // Start the process.  It will either succeed and return a result containing
    // the PID of the new process, or else throw a RuntimeException.
    Process.ProcessStartResult startResult = Process.start("android.app.ActivityThread",
                app.processName, uid, uid, gids, debugFlags,
                app.info.targetSdkVersion, null);

    BatteryStatsImpl bs = app.batteryStats.getBatteryStats();
    synchronized (bs) {
        if (bs.isOnBattery()) {
            app.batteryStats.incStartsLocked();
        }
    }

    ...... // log信息

    synchronized (mPidsSelfLocked) {
            this.mPidsSelfLocked.put(startResult.pid, app);
            Message msg = mHandler.obtainMessage(PROC_START_TIMEOUT_MSG);
            msg.obj = app;
            mHandler.sendMessageDelayed(msg, startResult.usingWrapper
                    ? PROC_START_TIMEOUT_WITH_WRAPPER : PROC_START_TIMEOUT);
    }

}
可以看出,Process.start(通过 Zygote)启动的实际上就是"android.app.ActivityThread"这个入口类。
4.4 ActivityThread.main
作为一个 java 入口类,ActivityThread 自然有自己的 main 函数,该函数一共做了两件事:1. ActivityThread.attach,2. Looper.loop(这也就是每个 android 应用程序的进程中主线程的 Looper 了)。ActivityThread 的 main 函数如下代码段所示:
public static void main(String[] args) {
    SamplingProfilerIntegration.start();

    // CloseGuard defaults to true and can be quite spammy.  We
    // disable it here, but selectively enable it later (via
    // StrictMode) on debug builds, but using DropBox, not logs.
    CloseGuard.setEnabled(false);

    Process.setArgV0("<pre-initialized>");

    Looper.prepareMainLooper();
    if (sMainThreadHandler == null) {
        sMainThreadHandler = new Handler();
    }

    ActivityThread thread = new ActivityThread();
    thread.attach(false);

    if (false) {
        Looper.myLooper().setMessageLogging(new
                LogPrinter(Log.DEBUG, "ActivityThread"));
    }

    Looper.loop();

    throw new RuntimeException("Main thread loop unexpectedly exited");
}
此时已经在创建的新进程上下文中了,我们在下一篇文章中来分析在该新进程中,是如何搞定 Application 的初始化和 Service 的启动的。