浅析 android 应用界面的展现流程(二)布局与视图的创建
在《浅析 android 应用界面的展现流程(一)》我们已经对周期函数有了一个系统的理解,本文将继续回归主线 - 界面展现,我们将会从 Activity 的启动(attach)开始,力争对 Activity 界面布局和视图结构有一个整体的把握。
3. 布局与视图的创建
3.0 attach
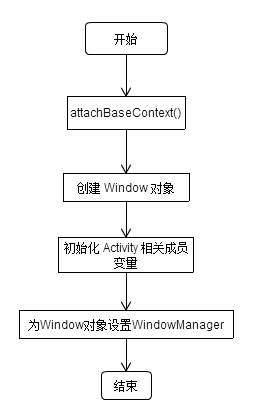
前面提到,在 onCreate 之前会将创建出来的 ContextImpl 对象 attach 到 Activity 上,执行的是 Activity.attach 函数,接下来我们来看看 attach 具体做了哪些工作:
<center>

图 3.1 Activity.attach(...) 处理流程图(Android4.4)</center>
可见,将 ContextImpl attach 到 Activity 中不是唯一的工作,创建 Window 对象和设置 WindowManager 其实包括在 初始化成员变量中,单拉出来是因为我们要展开说明,如下为 attach 函数代码:
final void attach(Context context, ActivityThread aThread,
        Instrumentation instr, IBinder token, int ident,
        Application application, Intent intent, ActivityInfo info,
        CharSequence title, Activity parent, String id,
        NonConfigurationInstances lastNonConfigurationInstances,
        Configuration config) {
1.  attachBaseContext(context);

    mFragments.attachActivity(this, mContainer, null);

2.  mWindow = PolicyManager.makeNewWindow(this); // 创建一个 Window 对象
    mWindow.setCallback(this); // 设置Callback,分发点击、属性变化等事件
    mWindow.getLayoutInflater().setPrivateFactory(this); // 设置 Factory2,即 inflate 时的 onCreateView 回调
    if (info.softInputMode != WindowManager.LayoutParams.SOFT_INPUT_STATE_UNSPECIFIED) {
        mWindow.setSoftInputMode(info.softInputMode);
    }
    if (info.uiOptions != 0) {
        mWindow.setUiOptions(info.uiOptions);
    }
3.  mUiThread = Thread.currentThread(); // 设置 mUiThread 为当前UI主线程

    mMainThread = aThread; // 赋值 ActivityThread 对象
    mInstrumentation = instr;
    mToken = token; // AMS 传过来的 ActivityRecord.Token 对象,封装了一些 ActivityRecord 的操作
    mIdent = ident; // ActivityRecord 的hashcode
    mApplication = application;
    mIntent = intent; // 启动该 Activity 的 Intent
    mComponent = intent.getComponent();
    mActivityInfo = info;
    mTitle = title;
    mParent = parent; // 如果在 ActivityGroup 中的话有意义
    mEmbeddedID = id; // 如果在 ActivityGroup 中的话有意义
    mLastNonConfigurationInstances = lastNonConfigurationInstances;

4.  mWindow.setWindowManager(
            (WindowManager)context.getSystemService(Context.WINDOW_SERVICE),
            mToken, mComponent.flattenToString(),
            (info.flags & ActivityInfo.FLAG_HARDWARE_ACCELERATED) != 0);
    if (mParent != null) {
        mWindow.setContainer(mParent.getWindow());
    }
    mWindowManager = mWindow.getWindowManager();
    mCurrentConfig = config;
}
attachBaseContext 即给作为 Wrapper 的 Activity 的成员 mBase 赋值(它实际是 ContextWrapper 的一个方法了),也就是流程的第一步:
@Override protected void attachBaseContext(Context newBase) {
    super.attachBaseContext(newBase);
    mBase = newBase;
}
接下来靠 PolicyManager.makeNewWindow 新建一个 Window 对象,Window 是一个抽象类,实际上就是 new 了一个 PhoneWindow,PhoneWindow 是目前 Window 的唯一实现)它描述了该 Activity 的窗口,我们最常用的 findViewById、setContentView 就是通过它来实现的),真正的 makeNewWindow 操作是在 com.android.internal.policy.impl.Policy 的 makeNewWindow 方法:
public Window makeNewWindow(Context context) {
    return new PhoneWindow(context);
}
在此时,PhoneWindow 初始化的变量是 mContext 与 mLayoutInflater。
第三步是 Activity 一些成员变量的初始化,这一步已经清楚的写在注释中了。
接下来是设置 WindowManager,在这里对 WindowManager 做一个初步介绍,算是对 WMS 的一个引言吧:
WindowManagerService,窗口管理服务,是与 ActivityManagerService、PackageManagerService、AlarmManagerService 一样运行在 SystemServer 进程中,普通应用程序通过Binder与其通信,扮演着管理组织窗口、计算位置与大小、启动/显示/切换窗口(包括动画)的角色。
在通常的开发中,当我们要在屏幕上添加悬浮窗这类 View 时,经常在一个 Activity 中使用 getWindowManger() 方法获得WindowManager对象,该对象就是在 attach 函数中赋值的。展开 Window.setWindowManager:
public void setWindowManager(WindowManager wm, IBinder appToken, String appName,
        boolean hardwareAccelerated) {
    mAppToken = appToken;
    mAppName = appName;
    mHardwareAccelerated = hardwareAccelerated
            || SystemProperties.getBoolean(PROPERTY_HARDWARE_UI, false);
    if (wm == null) {
        wm = (WindowManager)mContext.getSystemService(Context.WINDOW_SERVICE);
    }
    mWindowManager = ((WindowManagerImpl)wm).createLocalWindowManager(this);
}
mContext.getSystemService(Context.WINDOW_SERVICE) 得到 WindowManager 服务,其实返回的是个 WindowManagerImpl 对象(关于什么是 WINDOW_SERVICE、getSystemService 拿到的对象又是如何与 SystemServer 通信的、AMS/PMS等服务是如何注册的,可以看下这篇文章),在 WindowManagerImpl 中有两个重要的对象:mDisplay 和 mParentWindow,mDisplay 是提供显示大小和精度相关信息的对象,作为 Activity 的 Display 会是默认的一个全局单例实现,mParentWindow 是 Activity 的所谓本地的 WindowManagerImpl 中用到的,也就是 Activity 里的 PhoneWindow 对象。
Window 对象设置了 WindowManager 后,又将其赋值给 Activity 的 mWindowManager 字段,Activity.getWindowManager 拿的实际是 mWindowManager。
3.1 部署布局准备展现
本节除了 DecorView 的作用和布局外,还会对最常用的两个东西 setContentView 和 LayoutInflater 进行分析。
3.1.1 "骨架" - DecorView 的创建
前面一节已经提到,在 Activity 的 attach 方法中创建了 Window 对象(PhoneWindow),也就是说每个 Activity 对应一个 Window 对象,PhoneWindow 对象 和 Activity 对象 都有一个字段 mDecor,它就是整个窗体的父布局 - 骨架。
如果在 Activity.onCreate 中没有做 setContentView 或者 addContentView,那么 Activity.mDecor 的赋值和添加到窗体是在 Activity.onResume 执行之后,在 ActivityThread 中:
final void handleResumeActivity(IBinder token, boolean clearHide, boolean isForward,
        boolean reallyResume) {
    ......
    ActivityClientRecord r = performResumeActivity(token, clearHide);

    if (r != null) {
        ......
        if (r.window == null && !a.mFinished && willBeVisible) {
            r.window = r.activity.getWindow();
            View decor = r.window.getDecorView();// 此时 PhoneWindow.mDecorView 初始化
            decor.setVisibility(View.INVISIBLE);
            ViewManager wm = a.getWindowManager();
            WindowManager.LayoutParams l = r.window.getAttributes(); // 还真有命名为l的变量!
            a.mDecor = decor;
            l.type = WindowManager.LayoutParams.TYPE_BASE_APPLICATION;
            l.softInputMode |= forwardBit;
            if (a.mVisibleFromClient) {
                a.mWindowAdded = true;
                wm.addView(decor, l); // 此时 DecorView 添加到窗体中
            }
        } else if (!willBeVisible) {
            if (localLOGV) Slog.v(
                TAG, "Launch " + r + " mStartedActivity set");
            r.hideForNow = true;
        }
        ......
    }
    ......
}
其中 l 就是 PhoneWindow 对象的默认 WindowManager.LayoutParams,这里在后面讲到 ViewRootImpl.setView 时会提到。
PhoneWindow.mDecor 是在第一次获取时赋值的,即上面代码中的 r.window.getDecorView() 时:
public final View getDecorView() {
    if (mDecor == null) {
        installDecor();
    }
    return mDecor;
}
展开 installDecor 的开头部分代码,就可以看到 mDecor 的赋值了:
private void installDecor() {
    if (mDecor == null) {
1.      mDecor = generateDecor();
        mDecor.setDescendantFocusability(ViewGroup.FOCUS_AFTER_DESCENDANTS);
        mDecor.setIsRootNamespace(true);
        if (!mInvalidatePanelMenuPosted && mInvalidatePanelMenuFeatures != 0) {
            mDecor.postOnAnimation(mInvalidatePanelMenuRunnable);
        }
    }
    if (mContentParent == null) {
2.      mContentParent = generateLayout(mDecor);

        ......

    }
}
在 installDecor() 中,不仅仅有对 mDecor 的初始化(步骤1),而且有 content、title、actionbar 的初始化(步骤2)。
mDecor 的初始化其实就是简单的创建一个 DecorView 的对象(PhoneWindow.java):
protected DecorView generateDecor() {
    return new DecorView(getContext(), -1);
}
为了更简单的解释基本布局,actionbar 我们暂且不管,先来看下这样一个 Activity:
public class MainActivity extends Activity {

    @Override
    protected void onCreate(Bundle savedInstanceState) {
        super.onCreate(savedInstanceState);
    }
}
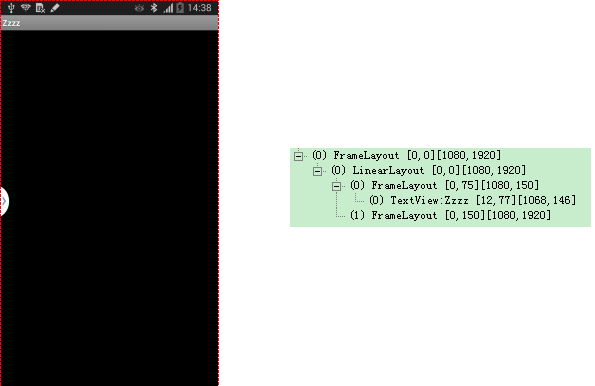
这个 Activity 没有任何的界面布局,就是一个空的页面实现,那么显示效果如下所示(label 为"Zzzz"),下边是 dump 出来的视图结构:
<center>

图 3.2 最简单页面的视图结构(sumsung note3,Android4.4)</center>
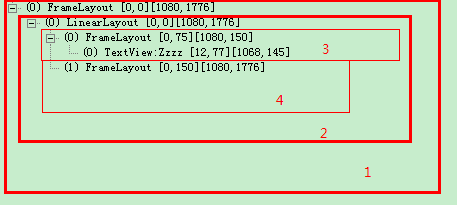
可以看出,一个基本的 Activity 会起码包有三层 ViewGroup,最外面一层其实就是前面提到的 mDecor,类型是 DecorView,继承于 FrameLayout:
<center>

图 3.3 DecorView mDecor</center>
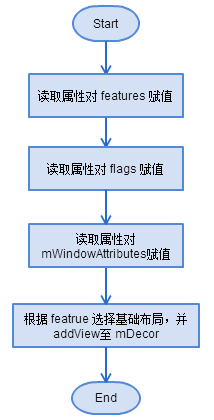
我们接着来看 installDecor() 的步骤2 - generateLayout:
<center>

图 3.4 generateLayout 基础流程</center>
上面视图中的节点均是在“根据 feature 选择布局,并 addView 到 mDecor”这一步添加进来的:
protected ViewGroup generateLayout(DecorView decor) {
    ......
    if ((features & (1 << FEATURE_NO_TITLE)) == 0) {
        // If no other features and not embedded, only need a title.
        // If the window is floating, we need a dialog layout
        if (mIsFloating) {
            TypedValue res = new TypedValue();
            getContext().getTheme().resolveAttribute(
                    com.android.internal.R.attr.dialogTitleDecorLayout, res, true);
            layoutResource = res.resourceId;
        } else if ((features & (1 << FEATURE_ACTION_BAR)) != 0) {
            layoutResource = com.android.internal.R.layout.screen_action_bar;
        } else {
            layoutResource = com.android.internal.R.layout.screen_title; // 这一行
        }
        // System.out.println("Title!");
    }
    ......
}
我们这里采用最简单的属性,只有一个 title,对应的就是上面有注释的那行布局 com.android.internal.R.layout.screen_title:
<!-- 2 -->
<LinearLayout xmlns:android="http://schemas.android.com/apk/res/android"
    android:orientation="vertical"
    android:fitsSystemWindows="true">
    <!-- Popout bar for action modes -->
    <ViewStub android:id="@+id/action_mode_bar_stub"
          android:inflatedId="@+id/action_mode_bar"
          android:layout="@layout/action_mode_bar"
          android:layout_width="match_parent"
          android:layout_height="wrap_content" />
    <!-- 3 -->
    <FrameLayout
        android:layout_width="match_parent"
        android:layout_height="?android:attr/windowTitleSize"
        style="?android:attr/windowTitleBackgroundStyle">
        <TextView android:id="@android:id/title"
            style="?android:attr/windowTitleStyle"
            android:background="@null"
            android:fadingEdge="horizontal"
            android:gravity="center_vertical"
            android:layout_width="match_parent"
            android:layout_height="match_parent" />
    </FrameLayout>
    <!-- end 3 -->
    <!-- 4 -->
    <FrameLayout android:id="@android:id/content"
        android:layout_width="match_parent"
        android:layout_height="0dip"
        android:layout_weight="1"
        android:foregroundGravity="fill_horizontal|top"
        android:foreground="?android:attr/windowContentOverlay" />
    <!-- end 4 -->
</LinearLayout>
<!-- end 2 -->
布局中已经对着上面的视图结构图标明了注释,这样一来就看的很清楚了,generateLayout 返回的 ViewGroup 实际就是4号(@android:id/content),然后就是为标题赋值:
private void installDecor() {
    ......
    if (mContentParent == null) {
        mContentParent = generateLayout(mDecor);
        mTitleView = (TextView)findViewById(com.android.internal.R.id.title);
        if (mTitleView != null) {
            mTitleView.setLayoutDirection(mDecor.getLayoutDirection());
            if ((getLocalFeatures() & (1 << FEATURE_NO_TITLE)) != 0) {
                ......
            } else {
                mTitleView.setText(mTitle);
            }
        }
        ......
    }
}
到此 installDecor() 方法就过完了,作为“骨架”的 DecorView mDecor 已经创建并初始化结束,包括赋值到 PhoneWindow 和 Activity。
3.1.2 自定义布局 - setContentView 与 LayoutInflater
上一小节我们知道了 DecorView 实际是个 FrameLayout,它是支撑整个窗体的父布局,作为最简单的界面,拥有一个 id 为 titled 的 TextView 作为标题,拥有一个 id 为 content 的 FrameLayout 作为内容父布局。基于此,我们在继续过 handleResumeActivity 的代码之前,来看下如何自定义布局。
所谓 Activity 的自定义布局无非是用 setContentView(int res) 来设置自己指定布局文件,这个操作我们经常放在 Activity.onCreate 中去做:
public void setContentView(int layoutResID) {
    getWindow().setContentView(layoutResID);
    initActionBar(); // 暂时忽略
}
从 3.0 节我们知道 getWindow() 拿到的实际是 PhoneWindow:
public void setContentView(int layoutResID) {
    if (mContentParent == null) {
1.      installDecor();
    } else {
2.      mContentParent.removeAllViews();
    }
3.  mLayoutInflater.inflate(layoutResID, mContentParent);
    final Callback cb = getCallback();
    if (cb != null && !isDestroyed()) {
        cb.onContentChanged();
    }
}
步骤1:mContentParent 实际就是上一节提到的 id 为 content 的 FrameLayout,即我们的内容区域,首次运行时 mContentParent 肯定为 null,则执行 installDecor(),上一节提到了,在 installDecor() 中,不仅仅有对 mDecor 的初始化,而且有 content、title、actionbar 的初始化,该操作不仅在这里会执行,如果没有对 Activity 进行 setContentView 操作的话,在 onResume 后第一次取 DecorView 实例的时候也会执行,这一点在上一节已经做了分析;
步骤2:如果已经做过 DecorView 和 mContentParent 的初始化了,很有可能 mContentParent 中已经有了自定义布局,先要移除;
步骤3:以 mContentParent 为父布局 inflate 指定布局资源,简单来讲就是在 mContentParent 这个容器中添加指定布局资源对应的布局视图。
浅谈 LayoutInflater
LayoutInflater 经常被用来初始化 XML 布局文件为 View 并布局到指定父布局中,我们经常这样来获取 LayoutInflater 对象:
LayoutInflater inflater = LayoutInflater.from(context);
展开 LayoutInflater.from:
public static LayoutInflater from(Context context) {
    LayoutInflater LayoutInflater =
            (LayoutInflater) context.getSystemService(Context.LAYOUT_INFLATER_SERVICE);
    if (LayoutInflater == null) {
        throw new AssertionError("LayoutInflater not found.");
    }
    return LayoutInflater;
}
在 ContextImpl 注册服务客户端时(关于 ContextImpl 中注册服务客户端,可以看下《浅谈 SystemServer》的第三节):
registerService(LAYOUT_INFLATER_SERVICE, new ServiceFetcher() {
    public Object createService(ContextImpl ctx) {
        return PolicyManager.makeNewLayoutInflater(ctx.getOuterContext());
}});
在 Policy.java 中:
public LayoutInflater makeNewLayoutInflater(Context context) {
    return new PhoneLayoutInflater(context);
}
可见每个 ContextImpl 对象会对应一个 PhoneLayoutInflater 对象。
另一方面文档中也这样说:
It is never used directly. Instead, use android.app.Activity.getLayoutInflater() or Context.getSystemService to retrieve a standard LayoutInflater instance that is already hooked up to the current context and correctly configured for the device you are running on.
从上面看,先来看下 Activity.getLayoutInflater():
public LayoutInflater getLayoutInflater() {
    return getWindow().getLayoutInflater();
}
实际是PhoneWindow.getLayoutInflater():
public LayoutInflater getLayoutInflater() {
    return mLayoutInflater;
}
PhoneWindow.mLayoutInflater 的初始化:
public PhoneWindow(Context context) {
    super(context);
    mLayoutInflater = LayoutInflater.from(context);
}
可以发现实际执行的还是 LayoutInflater.from(),所以不管你用哪个方法,只要 Activity 是同一个,取到的 LayoutInflater 都是一个。
LayoutInflater 的 inflate 方法有 4 种重载:
View inflate(int resource, ViewGroup root);
View inflate(XmlPullParser parser, ViewGroup root);
View inflate(int resource, ViewGroup root, boolean attachToRoot);
View inflate(XmlPullParser parser, ViewGroup root, boolean attachToRoot); // 最后都会执行到这个函数
XmlPullParser 其实就是解析完 resource 布局文件后的结果,所以第一个重载其实就是比第二个多了一步解析布局文件,第三第四也一样;另外,前两种重载中的 root 参数如果是 null 则对应后两种重载中 attachToRoot=false,反之则 attachToRoot=true,inflate 函数的坑就在于此,我们来看下第四个重载的后两个参数的说明:
- ViewGroup root
view to be the parent of the generated hierarchy (if attachToRoot is true), or else simply an object that provides a set of LayoutParams values for root of the returned hierarchy (if attachToRoot is false.)
如果 attachToRoot 为 true 的话,该参数就是父布局视图,反之如果 attachToRoot 为 false 的话,该参数就仅仅简单的是一个为顶部 View 提供 LayoutParams 的一个视图对象(说实话,我不觉得简单)。
- boolean attachToRoot
Whether the inflated hierarchy should be attached to the root parameter? If false, root is only used to create the correct subclass of LayoutParams for the root view in the XML.
attachToRoot 指示是否要把要创建的布局添加到 root 视图中,如果为 false,则 root 仅仅为了让这个要创建的布局在添加到某顶部视图时有一个正确的 LayoutParams。
- @return
The root View of the inflated hierarchy. If root was supplied and attachToRoot is true, this is root; otherwise it is the root of the inflated XML file.
返回顶部视图,如果 root!=null 且 attachToRoot=true,则返回的就是 root,否则返回的是所创建布局的顶部视图。
我们用一个例子来解释这个坑在哪,如下一个 Activity 的布局文件 activity_inflate.xml:
<?xml version="1.0" encoding="utf-8"?>
<RelativeLayout xmlns:android="http://schemas.android.com/apk/res/android"
    android:id="@+id/bg_parent"
    android:layout_width="fill_parent"
    android:layout_height="fill_parent"
    android:background="@color/white"
    android:orientation="vertical" >
    <LinearLayout
        android:id="@+id/bg"
        android:layout_width="wrap_content"
        android:layout_height="wrap_content"
        android:background="@color/black"
        android:orientation="vertical" >
    </LinearLayout>
</RelativeLayout>
在 Activity 中,我们用下面的字段来代表 id 分别为 bg_parent 和 bg 的这两个视图(bg 大小自适应也没内容,所以bg不会显示):
ViewGroup bg_parent, bg;

bg_parent = (ViewGroup) findViewById(R.id.bg_parent);
bg = (ViewGroup) findViewById(R.id.bg);
一个用来添加的 View 的布局文件 view_inflate.xml:
<?xml version="1.0" encoding="utf-8"?>
<LinearLayout xmlns:android="http://schemas.android.com/apk/res/android"
    android:id="@+id/content"
    android:layout_width="200dp"
    android:layout_height="200dp"
    android:layout_centerInParent="true"
    android:background="@color/av_bg_color_red"
    android:orientation="vertical" >
</LinearLayout>
坑 1 - 使用 inflate(R.layout.xxx, null)
inflate(R.layout.xxx, null) 实际相当于 inflate(R.layout.xxx, null, false),上面参数说明提到,如果 attachToRoot = false,那么参数 ViewGroup root 仅仅是为了给要返回的顶部 View 一个正确的 LayoutParams,但 root 如果也为null,那就意味着 LayoutParams 可能会不对。
如果我们在上面的 Activity 中使用 inflate(R.layout.xxx, null) 来创建视图,然后添加到 bg_parent 中:
View v = getLayoutInflater().inflate(R.layout.view_inflate, null);
bg_parent.addView(v);
你可能会以为结果就是白背景下显示了个 200*200 的红块,其实只有白背景,我们通过 v.getLayoutParams() 的方法取它的 LayoutParams
,发现为 null,那么在往 ViewGroup 中 addView 的时候会默认塞一个 ViewGroup.LayoutParam,宽高均为 WRAP_CONTENT;
既然这样写不对,那正确的应该如何写呢?
一种就是直接使用第二个参数指定父布局即可:
getLayoutInflater().inflate(R.layout.view_inflate, bg_parent);
另一种就是同时使用第二个参数(bg_parent)和第三个参数(false),然后再加到 bg_parent 中:
View v = getLayoutInflater().inflate(R.layout.view_inflate, bg_parent, false);
bg_parent.addView(v);
这两种方法没有区别,效果均为白色背景的正中间有一个200*200(dp)的红块(效果简单明显好描述,就不再贴图了),可见不仅 view_inflate.xml 中的 layout_width、layout_height 都生效了,android:layout_centerInParent 也针对父布局 RelativeLayout 生效了。
坑 2 - 使用 inflate(R.layout.xxx, root, false)
我们知道对应不同的父布局,子布局的属性有不同的表现,上面说我们用 inflate(R.layout.xxx, root, false) 创建 view 后,再用 addView 添加到 root 中,那么如果在使用 inflate(R.layout.xxx, root, false) 时第二个参数不用 addView 时所使用的 root,会有什么后果呢?
第三个参数如果为 false,那么第二个参数的作用仅仅是为了确定要添加的布局文件根view的 android:layout_XXXX 属性,拿上面写过的这段代码举例:
View v = getLayoutInflater().inflate(R.layout.view_inflate, bg_parent, false);
bg_parent.addView(v);
bg_parent 和 R.layout.view_inflate 会主动契合判断 R.layout.view_inflate 的根 view 中 layout_XXXXX 是否是生效,bg_parent 是一个 RelativeLayout,android:layout_centerInParent 属性自然生效,那么我们如果使用 bg 来作为第二个参数:
View v = getLayoutInflater().inflate(R.layout.view_inflate, bg, false);
bg_parent.addView(v);
bg 是 LinearLayout,android:layout_centerInParent 是没有任何作用的,实际效果也是如此,即白色背景左上角一个200*200(dp)的红块。
3.1.3 add DecorView 与 ViewRootImpl
在3.1.1节说了 DecorView 的创建了,那么 DecorView 是如何添加到界面中的呢?
前面说到在 handleResumeActivity 中,如果 setContentView 没有执行过,那么会在 Activity.onResume 之后初始化 Activity 的 mDecor 对象,紧接着就是通过 WindowManager.addView 将 mDecor 对象 add 到(当前 Activity 的)WindowManager 对象中,我们来展开 WindowManagerImpl.addView 方法:
@Override
public void addView(View view, ViewGroup.LayoutParams params) {
    mGlobal.addView(view, params, mDisplay, mParentWindow);
}
实际上是执行的是 WindowManagerGlobal.addView(一个 Activity 对应一个 WindowManagerImpl,但 WindowManagerGlobal 进程唯一):
public void addView(View view, ViewGroup.LayoutParams params,
        Display display, Window parentWindow) {
1.  if (view == null) {
        throw new IllegalArgumentException("view must not be null");
    }
    if (display == null) {
        throw new IllegalArgumentException("display must not be null");
    }
    if (!(params instanceof WindowManager.LayoutParams)) {
        throw new IllegalArgumentException("Params must be WindowManager.LayoutParams");
    }

    final WindowManager.LayoutParams wparams = (WindowManager.LayoutParams)params;
    if (parentWindow != null) {
        parentWindow.adjustLayoutParamsForSubWindow(wparams);
    }

    ViewRootImpl root;
    View panelParentView = null;

    synchronized (mLock) {
        // Start watching for system property changes.
        if (mSystemPropertyUpdater == null) {
            mSystemPropertyUpdater = new Runnable() {
                @Override public void run() {
                    synchronized (mLock) {
                        for (int i = mRoots.size() - 1; i >= 0; --i) {
                            mRoots.get(i).loadSystemProperties();
                        }
                    }
                }
            };
            SystemProperties.addChangeCallback(mSystemPropertyUpdater);
        }

2.      int index = findViewLocked(view, false);
        if (index >= 0) {
            if (mDyingViews.contains(view)) {
                // Don't wait for MSG_DIE to make it's way through root's queue.
                mRoots.get(index).doDie();
            } else {
                throw new IllegalStateException("View " + view
                        + " has already been added to the window manager.");
            }
            // The previous removeView() had not completed executing. Now it has.
        }

        // If this is a panel window, then find the window it is being
        // attached to for future reference.
        if (wparams.type >= WindowManager.LayoutParams.FIRST_SUB_WINDOW &&
                wparams.type <= WindowManager.LayoutParams.LAST_SUB_WINDOW) {
            final int count = mViews.size();
            for (int i = 0; i < count; i++) {
                if (mRoots.get(i).mWindow.asBinder() == wparams.token) {
                    panelParentView = mViews.get(i);
                }
            }
        }

3.      root = new ViewRootImpl(view.getContext(), display);

        view.setLayoutParams(wparams);

4.      mViews.add(view);
        mRoots.add(root);
        mParams.add(wparams);
    }

    // do this last because it fires off messages to start doing things
    try {
5.      root.setView(view, wparams, panelParentView);
    } catch (RuntimeException e) {
        // BadTokenException or InvalidDisplayException, clean up.
        synchronized (mLock) {
            final int index = findViewLocked(view, false);
            if (index >= 0) {
                removeViewLocked(index, true);
            }
        }
        throw e;
    }
}
我们将 addView 函数分为5步:
第一步无非是检验参数合法性,传进来的 params 必须是 WindowManager.LayoutParams;
第二步是查找之前你有没有添加过同样的 View,如果添加过且没有被 remove 则报 "View XXX has already been added to the window manager" 的异常;
第三步是创建该 View 对应的 ViewRootImpl,ViewRootImpl 控制着一个视图的结构(每次 addView 都会创建一个,相当于控制器),里面包含了与 WindowManager 通信的 Binder 对象、View 所在界面的 ContextImpl、该视图结构的顶端的 View 等信息;
第四步是把添加的 View、创建的 ViewRootImpl、布局参数添加到 WindowManagerGlobal 中去(以便第二步查找 View 是否被添加过的时候用到);
第五步是 ViewRootImpl.setView。
3.2 ViewRootImpl.setView
ViewRootImpl 的 setView 会导致 View 和 Activity 的 onAttachToWindow 回调执行,也是我们能看到界面的直接原因:
public void setView(View view, WindowManager.LayoutParams attrs, View panelParentView) {
    synchronized (this) {
        if (mView == null) {
            mView = view; // 为 mView 赋值,在这里其实是 Activity 的 DecorView
            mViewLayoutDirectionInitial = mView.getRawLayoutDirection();
            mFallbackEventHandler.setView(view);
            mWindowAttributes.copyFrom(attrs); // 拷贝传进来的 LayoutParams,这就是在 3.1 节提到的 PhoneWindow 中的LayoutParams
            if (mWindowAttributes.packageName == null) {
                mWindowAttributes.packageName = mBasePackageName; // 当前应用包名
            }
            attrs = mWindowAttributes;

            ......

            mSoftInputMode = attrs.softInputMode;
            mWindowAttributesChanged = true;
            mWindowAttributesChangesFlag = WindowManager.LayoutParams.EVERYTHING_CHANGED;
            mAttachInfo.mRootView = view; // 赋值 mAttachInfo
            mAttachInfo.mScalingRequired = mTranslator != null;
            mAttachInfo.mApplicationScale =
                    mTranslator == null ? 1.0f : mTranslator.applicationScale;
            if (panelParentView != null) {
                mAttachInfo.mPanelParentWindowToken
                        = panelParentView.getApplicationWindowToken();
            }
            mAdded = true;
            int res; /* = WindowManagerImpl.ADD_OKAY; */

            // Schedule the first layout -before- adding to the window
            // manager, to make sure we do the relayout before receiving
            // any other events from the system.
2.          requestLayout(); // 首次调度执行 layout,这里会触发 onAttachToWindow 和 创建 Surface
            ......
            try {
                ......
1.              res = mWindowSession.addToDisplay(mWindow, mSeq, mWindowAttributes,
                        getHostVisibility(), mDisplay.getDisplayId(),
                        mAttachInfo.mContentInsets, mInputChannel); // 与 WMS 通信添加该窗体对应的 WindowState
            } catch (RemoteException e) {
                ......
            }
            ......
        }
    }
}
该函数首先为 mView、mWindowAttributes、mAttachInfo 等重要字段赋值,然后提前进行调度 requestLayout()(即步骤2),当然真正的布局是在与 WMS 通信添加对应 WindowState 后执行的(即先执行步骤1,再执行步骤2)。
在这里先提一下这几个重要对象(也包括之前说过的),以及他们之间的联系:
- DecorView:一个 Activity 有一个,代表最根的布局
- PhoneWindow:一个 Activity 有一个,代表当前窗体
- WindowManagerImpl:一个 Activity 有一个,是 ActivityManager 服务的客户端的wrapper
- WindowManagerGlobal:单例,是 ActivityManager 服务的客户端
- Display:与 WindowManagerImpl 绑定,但是单例
- Activity:在 Activity 中可以直接获得 WindowManagerImpl、PhoneWindow、DecorView(没有接口,内部使用)
- ViewRootImpl:每次使用 WindowManager.addView 时都会创建一个,视图的控制器
- AttachInfo:与 ViewRootImpl 绑定,包含了视图的一系列信息
- WindowState:
- WindowStateAnim:
- Surface:
- Session:进程单例,对应到客户端是 IWindowSession
- W:作为客户端的 token,也提供了 WMS 与客户端通信的接口
- SurfaceControl:
- SurfaceSession:
下面将分两篇文章分别分析这两步(这块文章在结构上好像与罗老师的很是接近,各位看官莫喷):
- 在《浅析 android 应用界面的展现流程(三)WindowState》中将对 WindowState、WindowStateAnim、Session、W、SurfaceSession 做详细的分析,即步骤1,是将客户端与服务端相连的一步;
- 在《浅析 android 应用界面的展现流程(四)布局与绘制》中将会对 requestLayout() 进行展开分析,即步骤2,是开始布局与绘制的过程。
这么好的文章,为什么没人评论,逻辑清晰,大爱。
我居然看完了~~lz把源码解析得很透彻啊,让我对安卓界面加载的过程有了全新的了解!顶一个!
但是还是有一个问题搞不懂,怎么获取当前界面的宽高呢?如果界面刚好是和屏幕一样大就直接获取系统屏幕大小了。但是如果界面是一个对话框之类的呢?试了很多种方法,getWindow().getAtrributes().width 返回 -1,用getLayoutInflater().inflater(R.layout.xxx,null).getWidth();返回0。看了stackOverflows里面的答案,view.getViewTreeObserver().addOnGlobalLayoutListener(
new ViewTreeObserver.OnGlobalLayoutListener() {
@Override
public void onGlobalLayout() {
// make sure it is not called anymore
view.getViewTreeObserver().removeGlobalOnLayoutListener(this);
// your code to get dimensions of the view here:
// ...
}
});
或者 @Override
public void onWindowFocusChanged(boolean hasFocus) {
// TODO Auto-generated method stub
super.onWindowFocusChanged(hasFocus);
//get size here
}
之类的方法都还是不行。不知道楼主有没有什么好的方法。